Twenty-Minute Theater Tuning
Such is the reality of things that we often have very little time to wrestle a sound system into a performance-ready condition. Here is a tuning I did today of a 1200-seat theater that took twenty minutes start to finish, and most of that time was running around with a microphone.
A lot of the work is done ahead of time with a good model / prediction situation. Get the array hung in the right spot, at the right height, aimed the right way, and with the proper splay angles, and you will be 85% there.
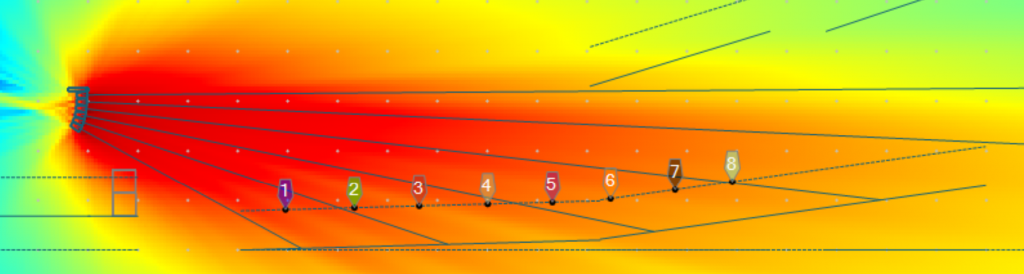
I have six small-format boxes per side to work with. Since there are no (functioning) underbalc delays, I chose the highest trim height possible that would still penetrate all the way to the back of the house (mix position) without slapping into the front of the balcony. Here’s the EASE Focus model:

This is two boxes @ 3°, 2 boxes @ 5°, 2 boxes @ 10°. I call those composites A, B, and C from top to bottom.
The rigging angles to produce those three composites are 3-4-5-7-10.
The dotted line is the listening plane (ear height). The little numbered doohickeys are “receivers” that allow Focus to model the frequency / SPL response at those locations. Basically you can think of them as mic positions during optimization. Ideally all those receivers should be…receiving..the same thing.
As we can see there is more LF down front (because it’s close to an effectively omni source) but the midrange hangs well together until about 2 kHz, above which the near boxes gain an advantage again. This prediction was done with the bottom composite (boxes 5 and 6) shaded down 3 dB, which isn’t enough to ruffle any feathers.
Here’s the Focus prediction at 4 kHz:
Smooth coverage, slightly hotter in front. I’ll take that.
Once it’s in the air, we have 20 minutes to work our magic. Here we go:
Spray pink through all parts of the system one at a time. My DSP outputs were
-
Left A (top four boxes),
-
Left B (bottom two boxes),
-
Right A,
-
Right B,
-
Sub Left,
-
Sub Right,
-
Front Fill (technically infill) L,
-
Front Fill R.
You probably want to know why I am driving subs in stereo. The system-techy answer is so I can more easily address a problem (polarity inversion, level imbalance) without running backstage and shuffling cables around. But I’m actually playing with a system that de-correlates L and R subs to reduce power alley and the “little blue rivers” on either side. It seems to work pretty well so far but I’m still tweaking it. Same thing with the front fills – all these boxes are active, so rather than have to go change a gain pot somewhere if there’s a 2 dB level difference, I can just do it from my computer. It’s also easier to measure one box at a time without powering off / unplugging / other nonsense.
At this point everything should come up in the proper place and sound reasonable (Left and Right should sound the same, etc). If L and R sound the same, I will tune left, and copy and paste those settings over. That saves time. I will also save time by not taking another round of measurements after I’m all done, and by not setting up a DSP Out signal into the analyzer. It’s nice – but not necessary – to see the EQ response on the screen. I play about twenty seconds of a reference track that already tells me I have a ton of LF buildup below about 250, so I know what I will have to do to this thing to get it to sound good. I now have a mental expectation of what I should see on the analyzer. (This is important. If you don’t know what to expect, how will you spot a problem?)
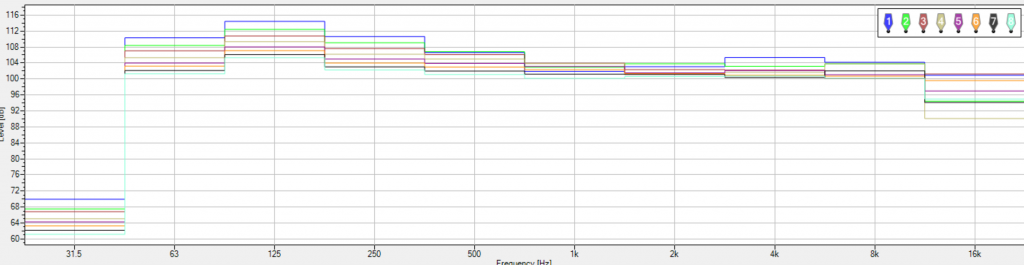
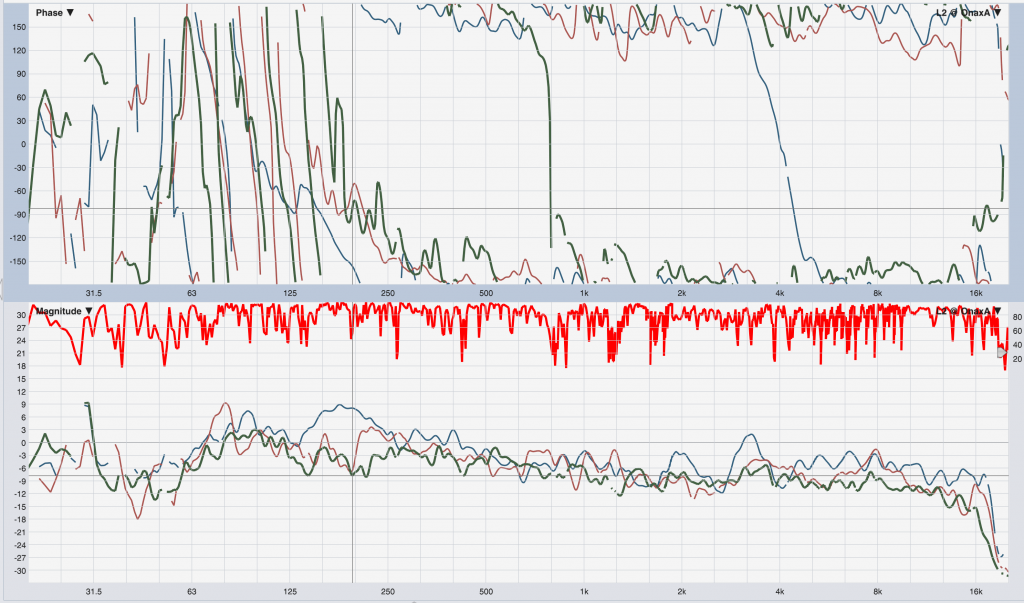
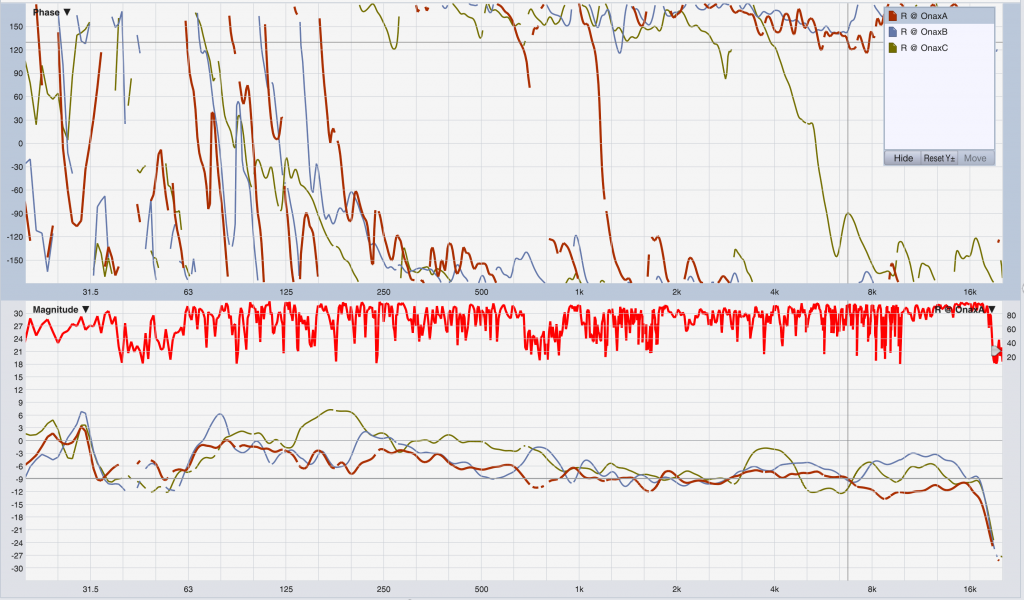
Measure the entire Left array on-axis to the three composites (OnaxA, OnaxB, OnaxC). This ended up being rows Z, M, and B. The aisle was close enough to onax that I used that.
I left the Trace Legend visible (upper right hand corner) so you can see which trace is which.
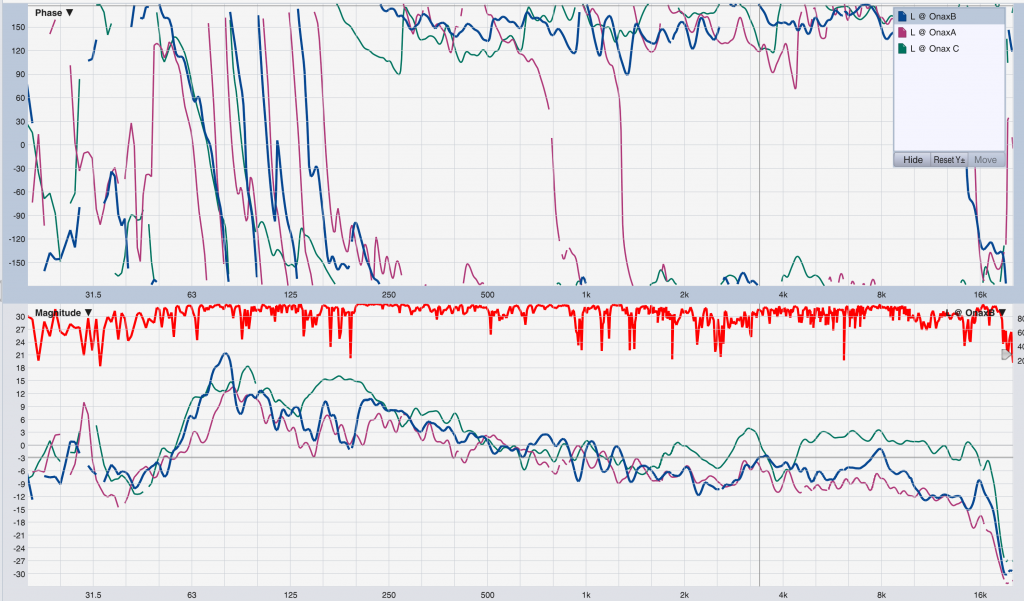
We are locked in throughout the midrange, just like in the prediction. Science!
Yes, this rig has an inherent polarity inversion in the DSP! it’s part of how they’re doing their FIR filtering to flatten out the phase above about 300 Hz. This is a good example of why you should get to know what your boxes look like in a controlled environment before taking them out into the wild. Yes, I left it like that. I have concerns about gain before feedback for this show so that saves me the trouble of flipping it later. As long as they all match we’re fine.
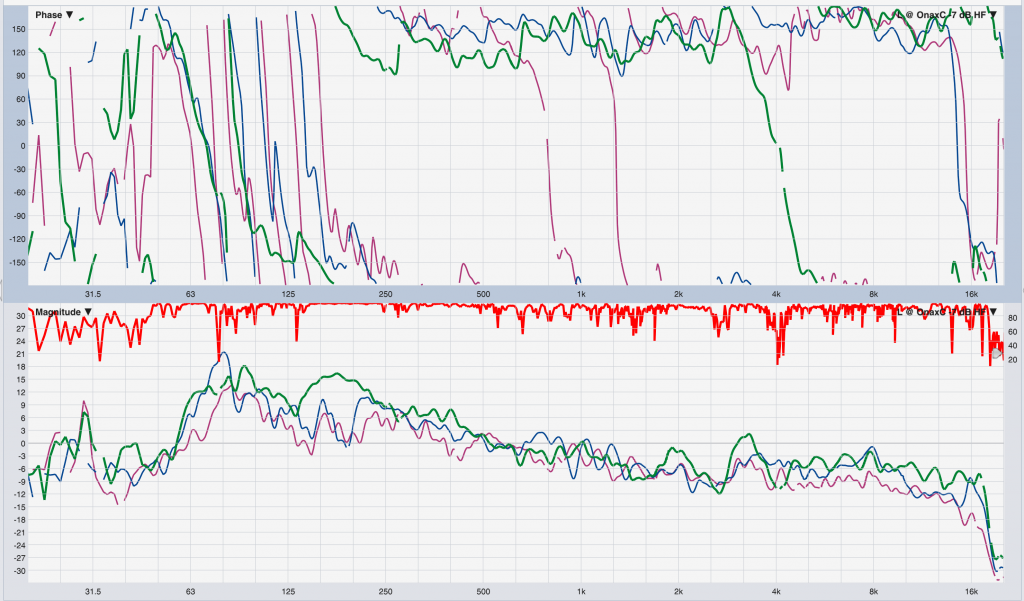
We can tell which trace is the bottom composite (C) because it’s starting to kick up a fuss above 2 kHz (which is exactly what the prediction said it would do, by the way). I have those two boxes on their own DSP channel anyway (-3 dB gain shading) so let’s hit it with a high shelf. The mic is already there, we can measure that one again after.
Here it is down by 7 dB:
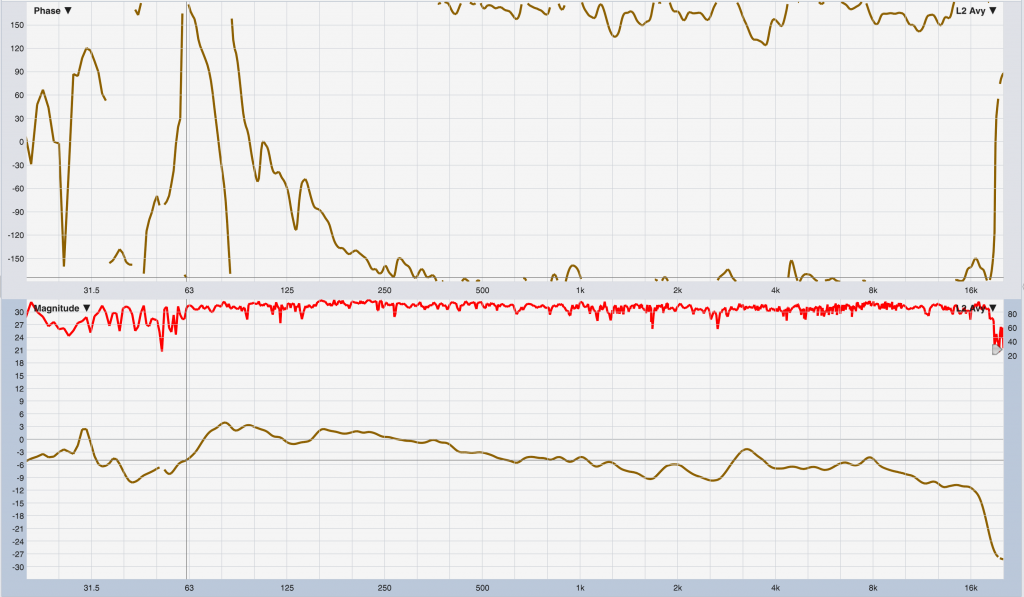
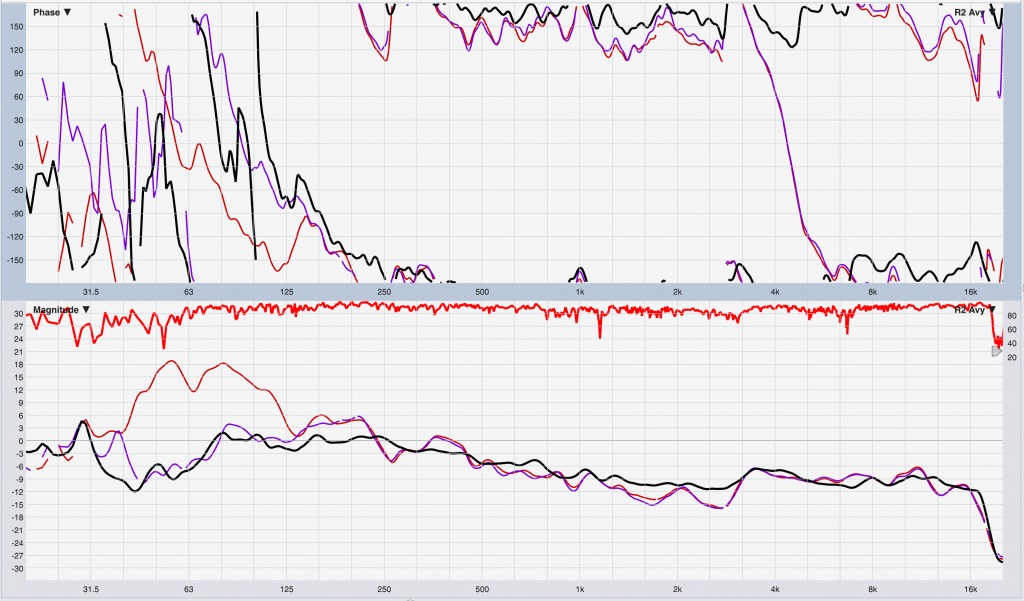
Now that we have some very respectable front-to-back uniformity happening, let’s create an average of those three traces so we can make a best-fit EQ decision for the entire hang.
The LF tilt is is indeed substantial. Some people like to mix like this. If ya do, fine. I like to start off with a much gentler tilt in the LF and then flatten out up top. So I dropped in a low shelf on the matrices coming out of the desk, then took measurements from the same three positions (the mic is already down front, so I start there and work my way back to mix position).
That is a little more reasonable. I made a quick average of those three measurements, which we will use as a basis for the right side:
Now I am going to check the sub-main alignment. You probably know by now that I think this is a bit overrated but I’ll spend thirty seconds to make sure it’s not crazy. I chose an alignment point at mid-house, and measured L solo and L Sub solo.
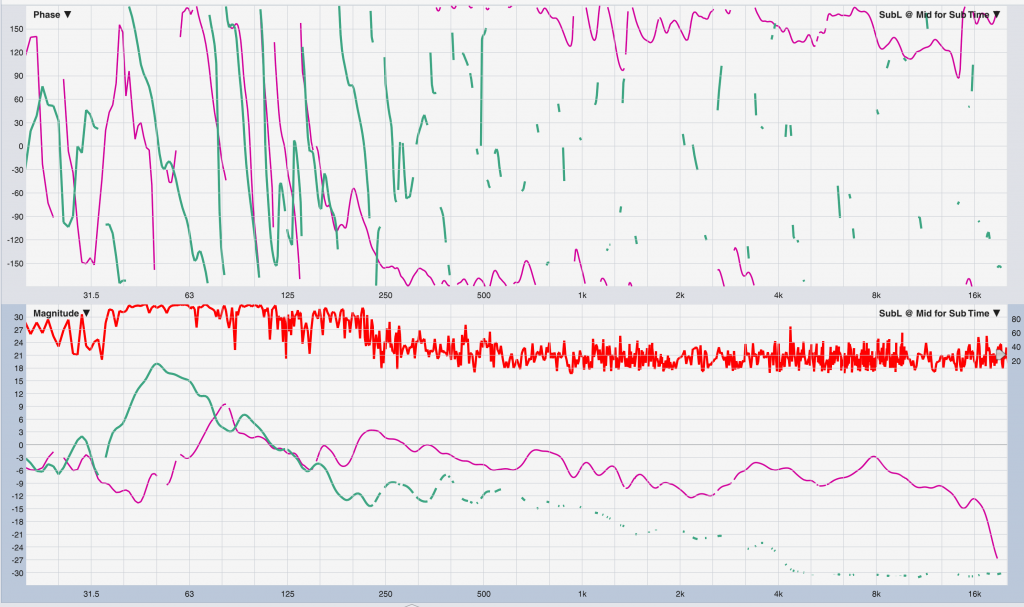
I have a lot of sub compared to relatively small mains, so it is not unexpected to see a relatively high crossover point. Notice how the two traces meet in level around 100 – 125. Right-click and rubber band zoom will let us look at that area’s phase pane in closer detail:
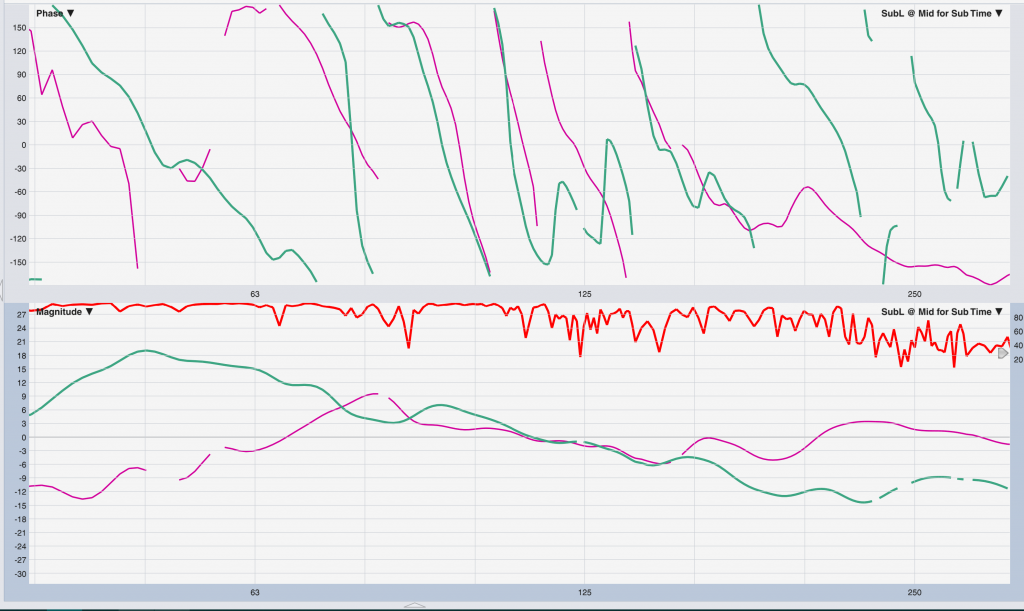
Despite the room stuff we can see that they are sitting on top of each other. Close enough for show business. Not touching it.
Copy / paste the processing to PA Right and let’s measure again from OnaxA, B, and C.
It sounded the same as Left, so no real surprise that it pretty much looks the same as left as well. I created an average of those three and compared it against the L average from earlier:

They match, but there’s a slight HF shelfy boost thing above about 3.15k that I don’t really want to mix into, so I knocked that down with a shelving filter on the console matrices (which are L/R linked).
Measure again from those three positions and average to get a new target curve (average in black). This will be the target curve for the fills.
You could find the extent of the center gap down front with the analyzer, but it’s quick to do it by ear, and this is by nature an imprecise, feathered transition so it doesn’t need to be down to the inch. My infills were two-way boxes placed on the deck just onstage of the subs and aimed at their local half of the front few rows. I used the on-box “monitor” preset because it rolls off the low-end for me and saves me the fifteen seconds of placing a filter. Thanks. Here’s what Fill R looks like from the center of its coverage. (Why fill right? The mic was already on house right.)

Spectrally, it will slot right into our target curve but it’s too damn loud. Use Ctrl – Down arrow or literally click and drag the trace downward on the screen until they overlap, then read the offset and decrease the drive by the same amount. (Measuring this again is a step I will skip if I’m pressed for time. I know what gain does.)
Now we need to align to the mains. These are very wide mains and I really don’t need a ton of fill action but the imaging and clarity will be better. I leave the mic in the center of the first row (the mains take custody soon after) and measure the output of the system here with the fill muted. We are measuring the gap we need to fill.
Here it is with and without the sub, with the target trace still present (black).
We are, atypically, not struggling here. Usually we can expect a HF rolloff but – wide mains. I feathered in the front fill on top anyways just for imaging reasons (fills are not flown, and neither is the talent). Obviously they are arriving early because they’re closer, as evidenced by the steep left-to-right phase slope.
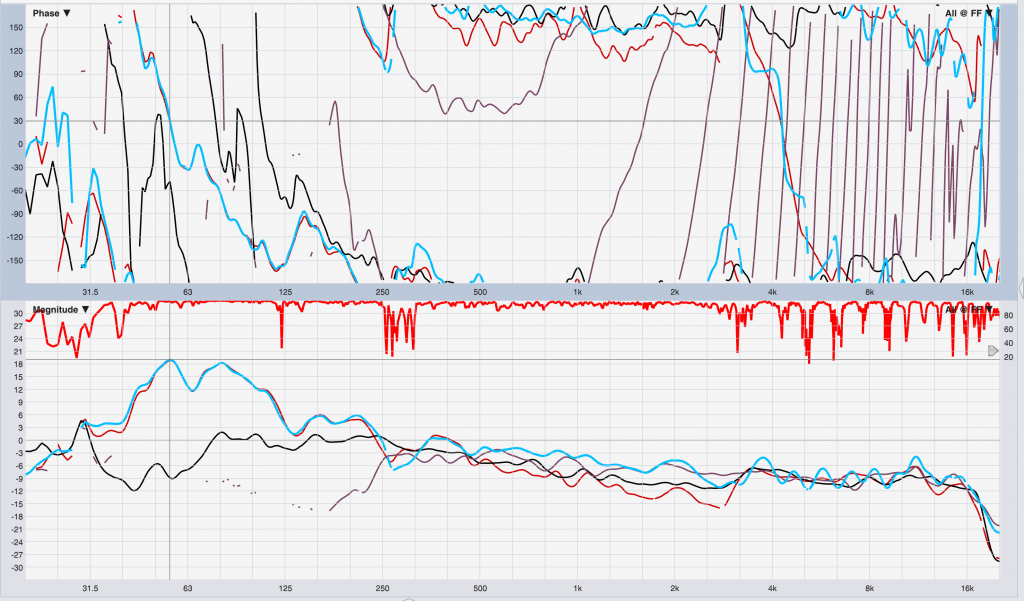
The blue trace shows the entire shebang from the same mic position after delay alignment. Notice the nasty little comb filter above 4k (ripple in magnitude response, spaced dips in coherence). An on-axis box from one manufacturer is never going to match phase response with the off-axis phase response of a line array from a different manufacturer. If I had time, I might go after this with an all pass, but in this case the fills are not super critical and the rippling in the response was quite audible in these few seats, so I will probably just mute them and call it a day.
There ye have it, a full tuning in 20 minutes. (21, according to the timestamps on the measurements). Make sure to listen and walk the space when you’re done. It’s not an etch a sketch 🙂
5 Replies to “Twenty-Minute Theater Tuning”
Nice detailed walk thru Michael – Thanks!
Thank you Bruce!
Thanks for the info! …
Thanks for sharing this Michael. Working by myself most of the time, I don’t get to see what other people are doing, much less what they are thinking.
I don’t see an image on step 9, but I think that’s just my stupid browser.
Oops! Not sure what happened there…it should be fixed now! Thanks for pointing it out 🙂